
When you source aluminum profiles for windows, doors, or curtain walls, you'll quickly encounter a critical decision: thermally broken or standard? For OEM buyers specifying custom profiles, this choice shapes everything from energy performance to long-term customer satisfaction.
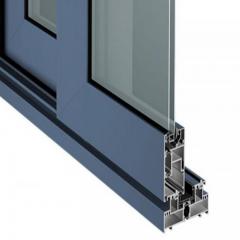
An OEM thermal break aluminum extrusion is a profile where a low-conductivity barrier material separates the inner and outer aluminum sections. This barrier, typically made from polyamide (PA66), interrupts the conductive heat path that would otherwise turn your aluminum frame into a thermal highway. The result? A profile that maintains aluminum's strength and aesthetics while dramatically improving insulation.
Thermal break profiles reduce heat transfer, condensation risk, and energy loss simultaneously, making them essential for energy-compliant fenestration products.
Imagine holding a metal spoon in hot coffee. Within seconds, the handle gets warm. That's thermal conductivity at work, and aluminum excels at it. Aluminum conducts heat at roughly 160 W/m·K, which makes it fantastic for heat sinks but problematic for building envelopes.
Now consider the polyamide strips used in thermally broken aluminum profiles. PA66 GF25 (polyamide reinforced with 25% glass fiber) conducts heat at approximately 0.3 W/m·K. That's more than 500 times less conductive than aluminum. When you insert this material between the interior and exterior aluminum sections, you effectively create two separate profiles connected by an insulating bridge.
This design prevents the exterior temperature from transferring directly to the interior surface. In winter, your frame stays warmer inside. In summer, it stays cooler. The physics are straightforward, but the manufacturing precision required to achieve consistent results is where OEM sourcing gets complex.
If you're reading this, you're probably not shopping for a single window. You're specifying profiles for production runs, private-label programs, or custom fenestration systems. That changes everything about how you evaluate thermally broken aluminium options.
OEM procurement involves concerns that retail buyers never consider:
When you source thermal break aluminium windows profiles through catalog purchasing, you accept standard dimensions and finishes. OEM programs give you control over profile geometry, surface treatment, and thermal break specifications, but they also require deeper technical engagement with your supplier. The sections ahead will walk you through the methods, manufacturing steps, and specification decisions that separate successful OEM programs from costly mistakes.
So you understand what thermal breaks do. Now comes the harder question: which method should you specify for your aluminum window extrusions? Pick wrong, and you'll face rework costs, production delays, or profiles that underperform in the field.
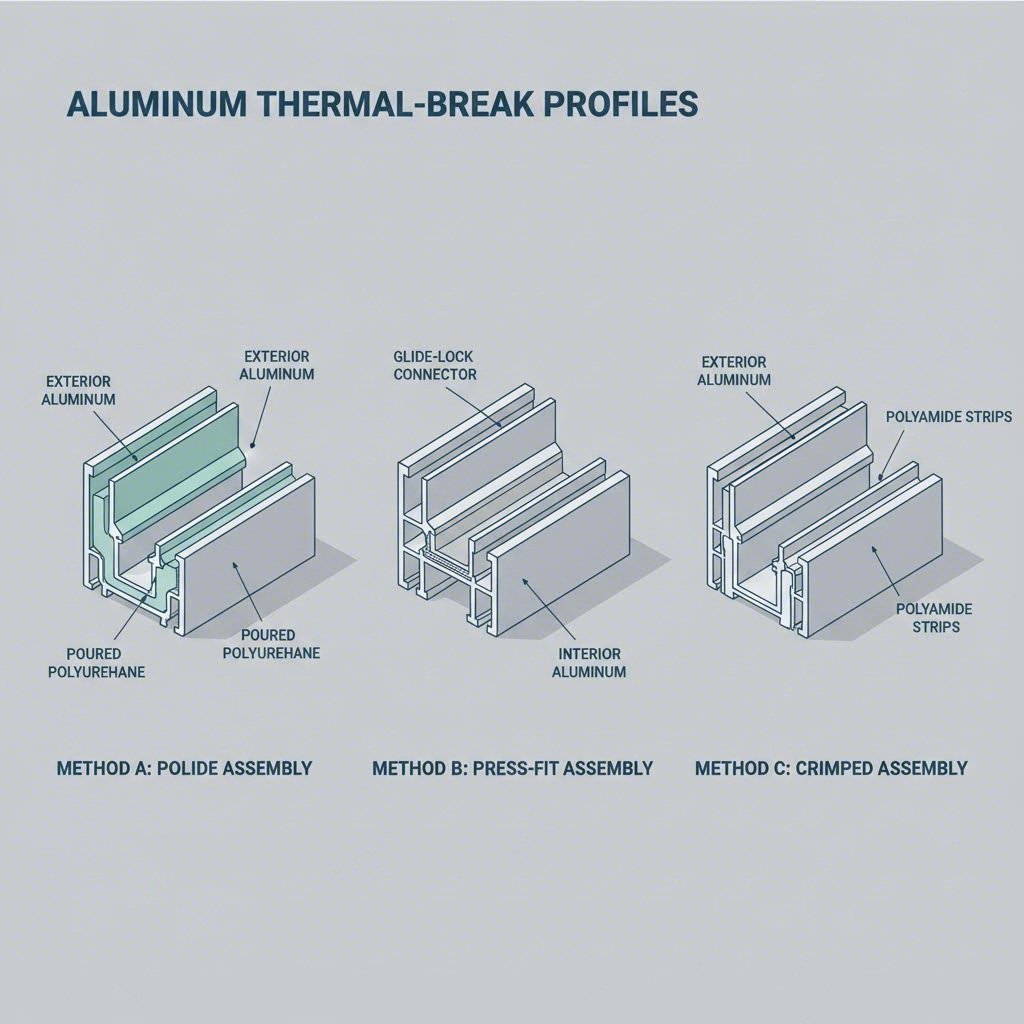
Three primary thermal break methods dominate OEM manufacturing. Each has distinct assembly processes, structural characteristics, and implications for your production program. Understanding these differences helps you match the right method to your application before tooling costs lock you in.
This is the workhorse method for thermally broken aluminum windows and doors. Pre-formed polyamide strips are mechanically inserted into dovetail-shaped channels machined or rolled into the aluminum profile. The assembly process involves three distinct steps:
The "GF25" designation matters here. It indicates 25% glass fiber reinforcement, with fibers oriented in all three dimensions. This reinforcement affects both rigidity and bond strength, making these strips suitable for everything from residential aluminum window frame extrusions to oversized commercial systems.
Strip geometry varies based on performance requirements. You'll encounter flat profiles, T-shaped configurations, and I-shaped designs. Wider strips provide better thermal separation, which directly improves U-values. Both solid and hollow chamber options exist, giving you flexibility to balance thermal performance against structural needs.
Why does this method dominate OEM programs? The expansion coefficient of polyamide (2.5 x 10⁻⁵/K) nearly matches aluminum (2.2 x 10⁻⁵/K). This means the composite assembly maintains structural integrity through temperature cycling without the shrinkage problems that plagued earlier methods.
Developed in North America during the 1950s, pour-and-debridge (P&D) takes a fundamentally different approach. Instead of inserting a pre-formed strip, this method creates the thermal barrier in place.
The process works like this: a two-part polyurethane resin is poured into a "dog bone" shaped cavity within the aluminum extrusion. After the resin cures, the aluminum bridge connecting the inner and outer sections is mechanically removed (debridged), leaving a monolithic thermal barrier.
P&D offers one notable advantage: lower thermal conductivity. Polyurethane thermal breaks conduct heat at approximately 0.12 W/m·K, compared to 0.3 W/m·K for polyamide. However, this advantage comes with significant OEM trade-offs.
The expansion coefficient mismatch creates long-term concerns. Unfilled polyurethane expands at roughly 15 x 10-5/K, nearly seven times the rate of aluminum. In the 1970s, this mismatch led to documented dry-shrinkage problems, causing water penetration in installed windows and doors. Modern formulations have improved, but the fundamental physics remain.
For OEM buyers, P&D also means longer cycle times and less flexibility. Once the resin cures, rework becomes difficult. If dimensional issues emerge during assembly, you're often looking at scrap rather than adjustment.
When you move into curtain wall and structural glazing applications, mechanical strut-based thermal breaks become relevant. These systems use rigid polyamide struts that are crimped or mechanically fastened between aluminum sections.
The approach suits high-load applications where the thermal break must handle significant structural stress. Curtain wall mullions, for example, need to resist wind loads while maintaining thermal separation across large spans. Strut systems distribute these loads more effectively than strip insertion in certain geometries.
However, strut systems typically require more complex tooling and assembly equipment. They're less common in residential and light commercial OEM programs, where polyamide strip insertion handles most requirements more cost-effectively.
The table below summarizes how each method performs across the criteria that matter most for OEM sourcing decisions:
| Criteria | Polyamide Strip Insertion | Pour-and-Debridge | Crimped Strut Systems |
|---|---|---|---|
| Assembly Process | Knurling, insertion, crimping (3 steps) | Surface conditioning, pour, cure, debridge | Strut positioning, mechanical crimping |
| Structural Integrity | Excellent; matched expansion coefficients | Good; potential shrinkage over time | Excellent for high-load applications |
| Rework/Repair Feasibility | Moderate; strips can sometimes be replaced | Low; cured resin is difficult to remove | Moderate; depends on fastening method |
| Typical OEM Application Fit | Windows, doors, light commercial systems | Specialized applications; declining use | Curtain walls, structural glazing |
| Tooling Implications | Standard crimping equipment; scalable | Specialized pour/cure equipment required | Application-specific tooling |
For most OEM programs producing thermally broken aluminum windows and doors, polyamide strip insertion offers the best balance of performance, production efficiency, and long-term reliability. Pour-and-debridge remains viable for specific applications but has largely given way to polyamide systems in European markets and is declining in North America. Strut systems serve a narrower niche where structural demands justify the additional complexity.
Understanding these methods is just the starting point. The next section walks through the complete manufacturing workflow, from die design through finished profile, so you can see exactly where specification decisions affect quality and cost.
You've selected your thermal break method. Now what? The journey from concept to delivered aluminum window profile involves multiple interdependent stages, and each one creates opportunities for quality gains or costly errors. Understanding this workflow helps you ask the right questions, catch problems early, and maintain control over your OEM program.
Here's the complete manufacturing sequence for thermally broken aluminium windows profiles, broken down into the stages that matter most for procurement and engineering decisions.
Every custom aluminum extrusion starts with tooling. For thermal break profiles, the die design must account for the channels that will eventually hold your polyamide strips or receive poured resin. Miss this detail, and you'll pay for die modifications later.
Die design collaboration and approval. The process begins with CAD-based profile design that includes dimensional specifications, tolerances, and critical features like thermal break channels. Engineers work with your supplier to optimize geometry for both manufacturability and thermal performance. Complex profiles with multi-void sections or thin walls require more sophisticated tooling, which affects both cost and lead time. Die test runs verify that the final profile meets shape, size, and tolerance requirements before full production begins.
Extrusion press selection. Profile complexity and alloy choice determine which press handles your job. Suppliers typically operate presses ranging from small tonnage units for simple shapes to high-capacity machines for large or intricate cross-sections. Higher extrusion forces allow larger dies and billets, producing profiles with greater cross-sectional areas. Your supplier matches press capacity to your profile requirements.
Billet heating and extrusion. Aluminum billets are preheated to approximately 400-500°C, making the metal ductile without melting it. The heated billet is then forced through the die under pressures typically ranging from 10,000 to 15,000 psi. A pulling device with flexible grippers draws the emerging profile forward, ensuring smooth, even extrusion across the entire length.
Aging and tempering. Heat treatment transforms the extruded profile's mechanical properties. For structural aluminium windows profiles, T5 and T6 tempers are most common. The aging process involves controlled heating that increases strength and hardness. T6 temper requires solution heat treatment by rapid quenching and artificial aging, delivering higher strength than T5. Your temper choice affects how the profile behaves during subsequent thermal break assembly, so this decision matters more than many buyers realize.
Thermal break channel machining or rolling. Before strip insertion, the profile needs precisely formed channels. These dovetail-shaped grooves can be machined into the extruded profile or formed during the extrusion process itself, depending on die design. Channel geometry and wall thickness tolerances directly affect how well the polyamide strip fits and bonds.
Strip insertion or pour-and-debridge assembly. This is where your thermal break method choice becomes physical reality. For polyamide strip insertion, the process involves knurling the channel interior, inserting the strip, and crimping the aluminum onto the strip under high pressure. Pour-and-debridge requires surface conditioning, resin pouring, curing, and mechanical removal of the aluminum bridge.
Finishing application. Surface treatments like anodizing, powder coating, or PVDF application protect the profile and deliver the aesthetic your customers expect. But here's where a critical OEM decision emerges: do you finish before or after thermal break assembly? This sequencing choice affects both quality and cost in ways that catch many buyers off guard.
Imagine receiving a shipment of profiles where the anodized finish looks perfect on the aluminum but the polyamide strips show discoloration or chemical residue. That's what happens when finishing sequencing goes wrong.
Finishing after thermal break assembly creates contamination risks. Anodizing involves acid baths and electrical current. Powder coating requires high-temperature curing. Both processes can damage or contaminate the polyamide strip if it's already installed. Chemical residue on the strip surface can weaken the bond over time, and heat exposure during powder coat curing may affect strip integrity.
Finishing before assembly avoids these contamination issues but introduces different challenges. The aluminum sections must be finished separately, then assembled with the thermal break strips afterward. This approach requires:
Neither approach is universally better. The right choice depends on your profile geometry, finish specification, and supplier capabilities. What matters is making this decision deliberately during specification, not discovering the trade-offs after production starts.
Quality control for thermal break profiles goes beyond standard dimensional inspection. Yes, you need measurements verifying that each extrusion meets specified tolerances. But assembled profiles also require testing specific to the thermal break bond.
Shear strength testing verifies that the polyamide-aluminum interface will hold under load. This test applies force to the strip until failure, confirming that the crimped connection meets structural requirements. For OEM programs, requiring shear test reports from your supplier provides documentation that the assembly process is performing consistently.
Dimensional inspection should specifically verify strip channel geometry. Wall thickness variations in the channel area directly affect strip fit and bond quality. Profiles that pass general dimensional checks can still fail at the thermal break if channel tolerances drift.
Packaging for thermal break profiles requires more care than solid extrusions. The assembled profile is essentially a composite structure, and the polyamide interface creates a potential failure point under impact or flexing during transit. Inadequate packaging leads to damage that's difficult to attribute and expensive to resolve. Specify protective measures appropriate for the shipping distance and handling conditions your profiles will encounter.
With the manufacturing workflow clear, the next question becomes: how do you verify that the finished profiles actually deliver the thermal performance your customers need? That requires understanding the metrics and energy codes that drive specification decisions.

Your customer hands you a specification sheet requiring a maximum U-value for aluminum window profiles. Do you know what that number actually means? Or how it relates to the thermal break aluminum profile you're sourcing? For OEM buyers, understanding thermal performance metrics isn't optional. It's the difference between winning contracts and losing them to competitors who speak the language of energy codes.
This section breaks down the metrics that matter most when specifying thermally broken profiles for energy-compliant fenestration products.
Think of U-value as a measure of how quickly heat escapes through your aluminum extrusion. The lower the number, the better the profile insulates. A typical U-value range for windows falls between 1.2 and 0.2, with high-performance thermally broken systems pushing toward the lower end of that spectrum.
R-value works in the opposite direction. It measures thermal resistance, so higher numbers indicate better insulating performance. The two metrics are mathematical reciprocals: R-value equals 1 divided by U-value. When you see a thermal break aluminum profile with a low U-value, you're looking at a high R-value product.
Here's why this matters for your OEM program: standard aluminum profiles without thermal breaks have poor U-values because aluminum transfers heat efficiently. Inserting a polyamide barrier dramatically reduces heat transfer, which is why thermally broken profiles achieve significantly lower U-values than their non-broken counterparts.
| Metric | What It Measures | Better Performance | Typical Range (Windows) |
|---|---|---|---|
| U-Value (U-Factor) | Heat transfer rate through the system | Lower is better | 1.2 - 0.2 |
| R-Value | Thermal resistance of materials | Higher is better | 1 - 5+ |
When your customers request specific aluminum extrusion U value requirements, they're typically referencing NFRC testing protocols. The National Fenestration Rating Council establishes standardized measurement conditions that allow apples-to-apples comparisons across different products. NFRC-certified windows display U-Factor on their energy performance labels alongside other ratings like Solar Heat Gain Coefficient and Visible Transmittance.
For thermal extrusion specification, you'll notice that U-value accounts for heat transfer through conduction, convection, and radiation combined. This gives you a complete picture of how the assembled window or door system performs, not just the frame material in isolation.
Ever seen moisture beading on the inside of a window frame during winter? That's condensation forming because the frame surface temperature dropped below the dew point of the indoor air. For OEM buyers targeting cold-climate markets, preventing this problem is a major selling point.
Thermal break profiles address condensation by raising the interior surface temperature of the frame. When the polyamide barrier interrupts heat flow, the inside aluminum section stays warmer because it's insulated from the cold exterior section. Warmer surfaces mean less likelihood of condensation forming.
The industry quantifies this benefit through condensation resistance ratings. The Condensation Resistance Factor (CRF), established under AAMA 1503, uses a scale from 0 to 100 where higher scores indicate better condensation resistance. A profile with a CRF of 70 will resist condensation formation better than one rated at 50.
The NFRC has also introduced a Condensation Index (CI) that uses simulation methods to predict condensation performance for specific climate conditions. As outdoor temperatures get colder, a higher CI is needed to prevent moisture problems. This metric helps OEM buyers match profile specifications to the climate zones where their products will be installed.
Windows do not create the moisture for condensation; they only react to their environment. The thermal break determines how well they react.
When specifying aluminum window profiles for northern markets, verify that your supplier can provide CRF or CI documentation. This data becomes part of your value proposition to customers who need fenestration products that perform in harsh winters without interior moisture problems.
Your end customers don't just want energy-efficient windows. They need windows that comply with specific energy codes. Understanding which frameworks drive their requirements helps you specify the right thermal break profiles from the start.
Three primary energy code frameworks shape fenestration specifications across North American and international markets:
Each framework tests different aspects of fenestration performance and applies different compliance thresholds based on climate and building type. You don't need to memorize every requirement, but you do need to understand what your customers are asking for when they reference these standards.
The practical takeaway? When specifying thermal break profiles, ask your customers which energy codes apply to their projects. This information determines the U-value targets, condensation resistance requirements, and testing documentation you'll need from your extrusion supplier. Getting this alignment right at the specification stage prevents costly surprises when products reach the field.
Performance metrics tell you what your profiles need to achieve. But how do you actually source them? The next section explains the difference between OEM private-label programs and catalog sourcing, and why that distinction matters for your business.
You've got your thermal performance targets. You understand the manufacturing workflow. Now comes a decision that shapes your entire supply chain: do you source standard profiles from a supplier's catalog, or do you commission custom aluminum extrusion profiles built exclusively to your specifications?
This distinction matters more than most buyers realize. Catalog sourcing gets you profiles faster and with lower upfront costs. Private-label OEM programs give you control over geometry, branding, and intellectual property. Choosing wrong locks you into limitations that become expensive to escape.
When you buy from a supplier's catalog, you're selecting from their existing die inventory. These dies already exist, have been tested, and produce profiles with known dimensions and tolerances. You place an order, the supplier runs the extrusion, and you receive standard profiles that match their published specifications.
Sounds simple? It is. But catalog sourcing comes with trade-offs:
Private label aluminum profiles work differently. You commission custom die development based on your engineering requirements. The supplier manufactures a new die, typically from H13 steel, with an opening that matches your exact cross-section design. Once approved, that die produces profiles exclusively to your specification.
The implications extend beyond geometry. With OEM aluminum extrusion programs, you control:
For thermal break profiles specifically, custom die development lets you specify channel width, depth, and wall thickness tolerances that ensure consistent strip fit across production runs. Catalog profiles force you to adapt your assembly process to someone else's design decisions.
Here's a question most buyers don't ask until it's too late: who owns the die after you pay for its development?
Aluminum extrusion die ownership determines what happens when you want to switch suppliers, scale production across multiple facilities, or exit a supplier relationship that isn't working. Three common structures exist, and each carries different implications:
| Ownership Model | Who Owns the Die | Switching Suppliers | Scaling Production |
|---|---|---|---|
| Buyer-Owned Die | You own it; supplier holds it | You can retrieve and relocate | Move die to second supplier |
| Supplier-Owned Die | Supplier owns; you license use | Die stays with supplier | Commission new die elsewhere |
| Shared-Cost Die | Joint ownership with usage rights | Negotiated exit terms apply | Depends on contract terms |
With buyer-owned dies, you pay the full tooling cost upfront. The die is manufactured to your specifications and held at the supplier's facility for production. If the relationship ends, you can request the die be shipped to a new supplier. This model gives you maximum flexibility but requires higher initial investment.
Supplier-owned dies reduce your upfront costs. The supplier absorbs some or all of the tooling expense and recovers it through per-kilogram pricing over time. The catch? That die belongs to them. If you want to move production elsewhere, you'll need to commission a new die at the new facility.
Shared-cost arrangements split the difference. You contribute partial tooling costs, and the supplier contributes the rest. Usage rights and exit terms get negotiated into the contract. These arrangements work well for long-term partnerships but can create complications if either party wants out.
Beyond ownership, consider maintenance. Dies require periodic polishing to maintain surface quality, and eventually need repair or replacement as they wear. Some suppliers include maintenance costs in their per-kilogram pricing. Others bill separately. Clarify this before signing contracts, because maintenance costs add up over high-volume production runs.
Custom thermal break profiles don't appear overnight. OEM programs involve approval stages that add time and complexity compared to catalog purchasing.
The typical sequence looks like this:
Each stage requires your input and approval. Rush through FAI, and you risk approving profiles with dimensional issues that cause assembly problems later. Take too long, and your production schedule slips.
Minimum order quantities for custom aluminum extrusion profiles typically exceed catalog profile MOQs. Why? Because the supplier needs to amortize tooling costs and setup overhead across your order volume. New custom profiles generally require 500 kg to 1000 kg to reach reasonable per-kilogram pricing. Complex shapes or tight tolerances push that threshold higher, often to 800-1200 kg.
For thermal break profiles, the math gets more complicated. You're not just meeting extrusion MOQ. Surface treatments like anodizing or powder coating often carry their own minimum thresholds, sometimes higher than the extrusion MOQ itself. Your effective minimum becomes the larger of the two requirements.
Prototype runs offer a middle path. Some suppliers accept smaller quantities in the 100-300 kg range for sample orders, though you'll pay a premium per kilogram. These prototype runs let you validate fit, finish, and thermal break assembly before committing to full production volumes. The extra cost per kilogram is usually worth it compared to discovering problems after a large production run.
Plan both extrusion MOQ and finishing MOQ before committing to a custom program. The higher number determines your true minimum order.
Understanding these sourcing models helps you structure supplier relationships that support your business goals. But once you've chosen your approach, how do you verify that incoming profiles meet your specifications? The next section provides a practical checklist for qualifying suppliers and testing assembled thermal break profiles.
You've identified your thermal break method, understood the manufacturing workflow, and decided between catalog and custom sourcing. Now comes the part where many OEM programs stumble: verifying that what you specified is actually what you receive. Without a systematic approach to aluminum extrusion supplier qualification and incoming quality control, you're trusting that everything went right. That's a risky bet when your reputation rides on the finished product.
This section gives you a practical framework for evaluating suppliers before you commit and testing profiles after they arrive. Think of it as your quality insurance policy.
Before placing your first order, verify that a potential supplier can document these critical elements:
Collecting this documentation upfront establishes baseline expectations. It also gives you leverage if quality issues emerge later, because you'll have agreed-upon standards to reference.
Supplier qualification gets you started. Ongoing quality verification keeps you protected. Here are the tests that matter most for aluminum extrusion quality control on thermal break profiles:
Shear strength testing of the polyamide-aluminum bond. This destructive test applies lateral force to the thermal break strip until the bond fails. Results tell you whether the crimping process created adequate mechanical interlock. For high-load applications like curtain walls, polyamide struts must endure shear stresses exceeding 35 MPa to resist delamination under wind loads. Request periodic shear test reports from your supplier, especially when production parameters change or new operators join the line.
Thermal cycling tests. Real-world installations subject profiles to repeated temperature swings. Thermal cycling tests simulate this exposure by alternating between hot and cold conditions over hundreds or thousands of cycles. The AAMA 505 thermal break standard outlines a laboratory method to measure dry shrinkage and retained composite longitudinal shear resistance after thermal cycling. This "differential" method qualifies all types of thermal barriers and catches materials that perform well initially but degrade over time.
UV aging resistance. For profiles with anodized or powder-coated finishes, UV exposure testing verifies that the surface treatment won't degrade prematurely. Glass-reinforced polyamide itself holds up well under UV exposure, retaining around 92% of its original tensile strength after 5,000 hours of accelerated weathering per ASTM G154. But finish degradation can still occur, so verify that your supplier tests the complete assembly, not just the aluminum substrate.
Dimensional tolerance verification for strip channel geometry. This is the detail that separates thorough quality programs from superficial ones. Wall thickness tolerances in the thermal break channel directly affect strip fit and assembly integrity. A profile might pass overall dimensional inspection while having channel geometry that's out of spec. Require specific measurements of channel width, depth, and wall thickness at multiple points along the profile length. Variations indicate die wear or process drift that will eventually cause assembly problems.
Wall thickness variations in the channel area are the hidden quality killer. Profiles that look perfect can still fail at the thermal break if channel tolerances drift.
Industry standards provide third-party validation that a supplier's processes and products meet established benchmarks. When evaluating thermal break extrusion standards compliance, focus on these three frameworks:
| Standard | What It Tests | Why OEM Buyers Should Require It |
|---|---|---|
| AAMA 505 | Dry shrinkage and composite shear resistance after thermal cycling | Validates that the thermal barrier maintains structural integrity through temperature extremes; essential for product qualification of all thermal break types |
| NFRC Certification | U-factor, Solar Heat Gain Coefficient, Visible Transmittance, and Condensation Resistance | Provides standardized energy performance ratings that enable code compliance and ENERGY STAR qualification; required for most commercial and residential projects |
| EN 14351 | Air permeability, water tightness, wind resistance, and thermal transmittance for windows and doors | European standard required for CE marking; necessary if you export to EU markets or serve customers with European specification requirements |
AAMA 505 deserves special attention for thermal break profiles. This test procedure uses the "differential" thermal cycling method to measure how much the thermal barrier shrinks and how much shear resistance it retains after repeated hot/cold exposure. Suppliers who can provide AAMA 505 test reports demonstrate that their assembly process produces durable bonds, not just bonds that pass initial inspection.
For NFRC certification, understand that the rating applies to the complete fenestration product, not just the frame profile. However, the frame's thermal performance directly affects the overall rating. When your customers need NFRC-certified windows, they need profiles that contribute to, rather than undermine, the target U-factor.
EN 14351 matters if you serve European markets or work with architects who specify to European standards. This comprehensive standard covers performance characteristics beyond thermal transmittance, including air and water tightness under pressure. Compliance requires third-party testing and ongoing production control.
Requiring documentation for these standards doesn't guarantee perfect quality. But it does establish that your supplier operates within recognized frameworks and can demonstrate compliance when questions arise. That documentation becomes valuable when you need to defend your product specifications to customers or resolve disputes about delivered quality.
With your qualification checklist and testing protocols in place, you're equipped to catch problems before they reach your production line. But what about the specification mistakes that create those problems in the first place? The next section covers the most common errors OEM buyers make and how to avoid them.
You've done the homework. You understand thermal break methods, manufacturing workflows, and supplier qualification. But here's the uncomfortable truth: even experienced OEM buyers make specification errors that create expensive downstream problems. These mistakes don't show up during quoting or even first article inspection. They surface months later, when profiles crack during assembly, bonds fail in the field, or finish quality complaints pile up.
The good news? Most aluminum extrusion specification errors follow predictable patterns. Knowing what to watch for helps you avoid the costly lessons that other buyers learned the hard way.
Imagine ordering profiles in T6 temper because you want maximum strength, only to discover that the aluminum cracks during thermal break channel rolling. That's what happens when aluminum extrusion temper selection doesn't account for post-extrusion processing requirements.
Here's the principle: T6 temper delivers higher strength than T5, but that strength comes from reduced ductility. The aluminum is harder and less forgiving during mechanical operations like knurling and crimping. When the crimping wheels apply over 1300 pounds of pressure to lock the polyamide strip in place, a T6 profile has less give than a T5 profile.
For some applications, T6 is exactly right. Structural curtain wall mullions that must resist high wind loads benefit from the extra strength. But for standard window and door profiles where the thermal break assembly involves aggressive channel deformation, T5 often performs better. The slightly lower strength is offset by improved workability during assembly.
The mistake happens when buyers specify temper based solely on final product strength requirements without considering the assembly process. A profile that's perfect on paper becomes problematic on the production line. Cracking at the channel edges, poor strip retention, or inconsistent crimping results all trace back to this mismatch.
Temper affects how aluminum behaves during assembly, not just how it performs in service. Specify based on both requirements.
Before finalizing temper specifications, discuss your thermal break assembly process with your supplier. If you're using automated crimping equipment with fixed parameters, verify that your temper choice is compatible with those settings. Adjusting crimping pressure for different tempers is possible but adds complexity and potential for error.
Polyamide strip aluminum extrusion assembly depends on precise dimensional matching. The strip width and the machined channel width must align within tight thermal break profile tolerances. Get this wrong, and you'll see problems at both extremes.
When the channel is too wide relative to the strip, the mechanical interlock weakens. The knurled teeth don't bite deeply enough into the polyamide. The crimping process can't generate sufficient grip. The result? A bond that passes initial inspection but fails under thermal cycling or structural load. Top manufacturers maintain extrusion precision within ±0.1 mm, while lower-quality suppliers may drift to ±0.5 mm or worse.
When the channel is too tight, different problems emerge. The strip may crack during insertion. Assembly becomes difficult, slowing production and increasing labor costs. Forced insertion can damage the strip surface, compromising the bond even if the profile looks acceptable afterward.
This error often surfaces when OEM buyers switch suppliers mid-program. Your original supplier's channel geometry matched your strip supplier's tolerances. The new extrusion supplier uses slightly different die dimensions or has different process controls. Suddenly, strips that fit perfectly before now cause assembly headaches.
The fix is straightforward but requires attention: specify channel geometry tolerances explicitly in your purchase orders, not just overall profile dimensions. Require dimensional inspection reports that include channel width, depth, and wall thickness measurements. When evaluating new suppliers, request sample profiles and test-fit your strips before committing to production volumes.
Remember the finishing sequencing discussion from earlier? This is where that decision becomes a specification mistake if you're not careful.
Buyers who specify anodizing or powder coating after thermal break assembly often overlook the masking requirements. Anodizing involves acid baths that can attack the polyamide strip surface. Powder coating requires curing temperatures that may affect strip integrity. Without proper masking, you receive profiles where the aluminum finish looks perfect but the strip shows chemical residue, discoloration, or surface degradation.
The contamination isn't always visible immediately. Chemical residue on the strip surface can weaken the aluminum-polyamide bond over time. Profiles that pass initial quality checks may develop bond failures months or years later, after they're installed in buildings where replacement is expensive and disruptive.
Specifying finish before assembly avoids contamination but creates different challenges. The aluminum sections must be finished separately, requiring precise masking of channel areas to prevent finish buildup that interferes with strip fit. Additional handling steps increase labor costs and damage risk. Finish consistency across separately processed sections requires careful coordination.
The mistake isn't choosing one sequence over the other. It's failing to specify the sequence explicitly and verify that your supplier's process matches your requirements. If you specify post-assembly finishing, confirm masking procedures and inspect strip surfaces on incoming shipments. If you specify pre-assembly finishing, verify channel area masking and test strip fit on finished sections.
Solid aluminum extrusions are relatively forgiving during shipping. Thermal break profiles are not. The assembled profile is a composite structure where the polyamide interface creates a potential failure point under impact or flexing.
Inadequate packaging specifications lead to transit damage that's difficult to attribute and costly to resolve. Did the damage occur at the supplier's facility, during loading, in transit, or during unloading at your site? Without clear packaging requirements and inspection protocols, these disputes become finger-pointing exercises that waste time and money.
The polyamide strip can crack or delaminate from impact that wouldn't damage a solid extrusion. Flexing during handling can stress the bond, especially at profile ends where the strip terminates. Stacking without proper interleaving can transfer point loads that concentrate stress at the thermal break.
Specify packaging requirements appropriate for the shipping distance and handling conditions your profiles will encounter. For international shipments, consider the number of handling transfers, climate variations during transit, and the capabilities of receiving facilities. The cost of better packaging is trivial compared to the cost of receiving damaged profiles and negotiating responsibility.
Before finalizing your next thermal break profile specification, verify that you've addressed these common error categories:
Catching these errors at the specification stage costs nothing. Discovering them after production runs, shipments, or field installations costs far more than the time spent getting specifications right upfront.
Now that you know what mistakes to avoid, the next question becomes: how do you choose the right thermal break method for your specific application, climate targets, and production volumes? The following section provides a decision framework to match method selection with your OEM program requirements.
You've learned the methods, spotted the mistakes, and built your qualification checklist. Now comes the decision that ties everything together: which thermal break method actually fits your program? The answer depends on three factors that interact in ways most buyers don't anticipate until they're locked into tooling commitments.
Think of method selection as a three-dimensional puzzle. Your product category sets the baseline requirements. Your target climate zones determine performance thresholds. Your production volume dictates which methods remain economically viable. Get all three aligned, and your program runs smoothly. Miss one, and you'll spend months working around a decision you can't easily reverse.
What are you actually building? The answer narrows your options faster than any other factor.
For residential and light commercial window and door profiles, polyamide strip insertion dominates for good reason. The method delivers the right balance of thermal performance, structural integrity, and production scalability. Strip widths ranging from 15mm to 40mm cover most residential U-value requirements, and the assembly process scales efficiently from prototype runs to high-volume production. When your customers need standard casement windows, sliding doors, or tilt-and-turn systems, polyamide strips handle the job without overcomplicating your supply chain.
Pour-and-debridge suits a narrower set of applications. When you need a wider thermal break zone than standard polyamide strips can provide, or when your profile geometry makes strip insertion impractical, P&D becomes relevant. The method also allows for more complex aluminum extrusion shapes and can accommodate specialized hardware requirements. But remember the trade-offs: longer cycle times, less rework flexibility, and the expansion coefficient concerns discussed earlier.
Aluminum curtain wall thermal break applications typically call for strut or crimped systems. These high-load structural glazing programs face wind loads, dead loads, and thermal movement that exceed what standard strip insertion handles comfortably. Strut-based thermal breaks achieve high-strength bonds between aluminum and the thermal break material, creating composite assemblies suitable for monumental curtain wall systems. If you're bidding on commercial high-rise projects or large-span structural glazing, strut systems belong in your specification toolkit.
Where will your products be installed? Thermal break extrusion climate zones drive performance requirements that directly affect method selection.
Cold-climate markets prioritize two metrics above all others: low U-values and high condensation resistance. When outdoor temperatures regularly drop below freezing, the interior surface temperature of your frame determines whether customers see moisture beading on their windows. Wider polyamide strips raise that interior surface temperature by creating more thermal separation between inside and outside aluminum sections.
The numbers tell the story. Thermally broken aluminum with a 15mm break achieves CRF ratings of 45-55, which still risks condensation in extreme cold. Bump that break width to 25mm or more, and CRF ratings climb to 60-75, providing good performance even when temperatures plunge. For buyers targeting northern U.S. states, Canada, or Scandinavian markets, specify wider strips and verify CRF documentation from your supplier.
Mixed and hot climates shift the priority matrix. Condensation resistance matters less when outdoor temperatures rarely drop below the dew point. Instead, solar heat gain and finish durability move up the list. Dark-colored aluminum frames can reach 70-80°C in direct sun, stressing both the thermal break bond and the surface finish. Buyers serving these markets should weight UV aging resistance and thermal cycling performance more heavily than maximum thermal break width.
Climate determines which performance metrics matter most. Specify for where your products will be installed, not where they're manufactured.
Here's where economics intersect with engineering. Not every thermal break method makes sense at every production volume.
Pour-and-debridge requires capital investment in curing equipment, mixing systems, and debridging machinery. The process also involves longer cycle times than polyamide strip insertion. For high-volume OEM programs running thousands of linear meters monthly, these factors get absorbed into per-unit costs. For low-volume programs producing hundreds of meters per month, the fixed costs become prohibitive. If your annual volume doesn't justify dedicated P&D equipment, you're either paying premium pricing to a supplier who has that equipment or choosing a different method.
Polyamide strip insertion scales more efficiently across volume ranges. The crimping equipment is relatively standardized, and cycle times are shorter. A supplier running strip insertion can switch between different profile geometries with modest changeover time, making the method practical for OEM programs with multiple SKUs or seasonal volume fluctuations. This flexibility explains why strip insertion dominates the residential and light commercial segments where product variety is high and individual SKU volumes are moderate.
Strut systems fall somewhere in between. The tooling is application-specific, but once configured, production runs efficiently. These systems make economic sense for curtain wall programs where individual project volumes are substantial and profile geometries remain consistent across the project scope.
Use this table as a quick-reference tool when evaluating which thermal break method fits your OEM program:
| Selection Criteria | Polyamide Strip Insertion | Pour-and-Debridge | Strut/Crimped Systems |
|---|---|---|---|
| Best Product Category Fit | Residential windows, doors, light commercial systems | Specialized profiles requiring wide thermal zones | Curtain walls, structural glazing, high-load applications |
| Cold Climate Suitability | Excellent with wider strips (25mm+) | Good; wider zones possible | Good; depends on strut configuration |
| Hot/Mixed Climate Suitability | Excellent; matched expansion coefficients | Moderate; expansion mismatch concerns | Excellent for structural applications |
| Low Volume Feasibility | High; scales down efficiently | Low; capital costs prohibitive | Moderate; project-dependent |
| High Volume Feasibility | Excellent; fast cycle times | Good once equipment is in place | Excellent for consistent geometries |
| Rework Flexibility | Moderate | Low | Moderate |
The right method isn't always the most thermally efficient one. It's the one that matches your product category, serves your target climate zones, and remains economically viable at your production volumes. Get this alignment right during specification, and you avoid the painful mid-program corrections that eat into margins and delay deliveries.
With your method selected and specifications locked, the final piece falls into place: finding a manufacturing partner who can execute your program from die development through mass production. The next section covers what to look for in an OEM thermal break extrusion partner.

You've mapped out your thermal break method, nailed down specifications, and built your quality checklist. Now comes the question that determines whether all that planning actually translates into reliable production: who manufactures your profiles?
The right OEM aluminum extrusion manufacturer doesn't just run metal through a press. They become an extension of your engineering team, catching specification gaps before they become production problems and scaling with your program as volumes grow. The wrong partner? They'll have you chasing quality issues, missing delivery windows, and explaining to customers why their windows don't perform as promised.
Everything covered in this article points toward a specific set of supplier capabilities. When evaluating a custom thermal break extrusion supplier, these criteria separate partners who can execute your program from those who'll struggle with it:
Integration matters too. A supplier with CNC machining and surface finishing under one roof can deliver finished or semi-finished products directly to your assembly line. This reduces transportation between subcontractors, prevents handling damage, and shortens lead time.
When you're looking for a partner that checks these boxes, Shengxin Aluminium offers a profile worth considering. With over 30 years in the industry, they've built capabilities specifically relevant to the OEM thermal break challenges discussed throughout this article.
Their facility houses 35 extrusion presses ranging from 600T to 5500T. That range matters because it means they can handle everything from precise residential window profiles on smaller presses to large structural curtain wall sections on high-tonnage equipment. You're not locked into a single press size that limits your product development options.
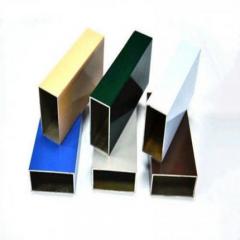
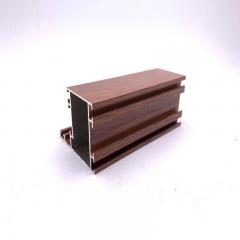
For the finishing sequencing decisions covered earlier, their surface treatment capabilities include anodizing in custom colors (including options like Champagne and Rose Gold), powder coating, PVDF, and micro-arc oxidation. This breadth means you can specify the finish that matches your thermal break assembly sequence without compromising on aesthetic options or durability requirements.
Their CNC machining centers handle post-extrusion processing — cutting, drilling, and bending to your specifications. This integration addresses the quality consistency concerns that arise when profiles move between multiple subcontractors for different processing steps.
What sets them apart for OEM programs specifically is their technical team support from die development through mass production. Rather than simply quoting on your drawings, they engage on manufacturability questions and help optimize specifications before tooling costs lock you in.
If you're evaluating suppliers for a thermal break extrusion program, explore their deep processing and custom extrusion services to see whether their capabilities align with your project requirements.
The supplier you choose determines whether your specifications become quality products or quality problems. Evaluate capabilities against the criteria that matter for thermal break profiles specifically.
A thermal break is a low-conductivity barrier material, typically polyamide PA66 GF25, inserted between inner and outer aluminum sections to interrupt heat transfer. While aluminum conducts heat at roughly 160 W/m·K, polyamide conducts at only 0.3 W/m·K, creating an insulating bridge that prevents exterior temperatures from transferring directly to interior surfaces. This design reduces energy loss, prevents condensation, and enables aluminum frames to meet modern energy codes.
Three primary methods exist: Polyamide strip insertion (PA66 GF25) is the most common, using pre-formed strips crimped into dovetail channels. Pour-and-debridge involves pouring polyurethane resin into a cavity, curing it, then removing the aluminum bridge. Strut and crimped systems use rigid polyamide struts mechanically fastened between sections, typically for curtain wall applications. Each method has different assembly processes, structural characteristics, and cost implications for OEM programs.
Temper selection depends on both final product requirements and assembly process compatibility. T6 delivers higher strength but reduced ductility, which can cause cracking during aggressive channel rolling or crimping operations. T5 offers moderate strength with better formability during thermal break assembly. For standard window and door profiles, T5 often performs better during assembly, while T6 suits structural curtain wall mullions requiring maximum strength. Always discuss your assembly process with suppliers before finalizing temper specifications.
Key certifications include AAMA 505 for thermal break performance testing (measures dry shrinkage and shear resistance after thermal cycling), NFRC certification for standardized energy performance ratings enabling code compliance, and EN 14351 for European market requirements covering air permeability, water tightness, and thermal transmittance. Suppliers like Shengxin Aluminium with 30+ years experience can provide comprehensive QC documentation including mill test reports, dimensional inspection data, and shear strength test results.
Custom thermal break profiles typically require 500 kg to 1000 kg minimum order quantities to achieve reasonable per-kilogram pricing. Complex shapes or tight tolerances push thresholds to 800-1200 kg. Surface treatments like anodizing or powder coating often carry separate MOQ requirements that may exceed extrusion minimums. Prototype runs of 100-300 kg are available at premium pricing for validation before full production. Experienced suppliers offer flexible die ownership arrangements and technical support from die development through mass production.


 Интернет Сервис
 0086 136 3563 2360
 sales@sxalu.com
 +86 136 3563 2360
 русский
 English
 français
 Deutsch
 español
 português
 العربية
 ไทย
ไทย Việt
Việt Українська