
Imagine rolling out of bed on a cold morning, coffee in hand, ready to peek outside — only to find your windows completely fogged over, water trickling down the glass and pooling on the sill. You grab a towel, wipe it away, and by lunchtime the moisture on windows in winter is right back. Sound familiar? You are not alone, and those sweaty panes are actually trying to tell you something important about the air inside your home.
House window condensation on inside surfaces boils down to one basic principle: warm, humid air releasing its moisture onto a cold surface. Every cubic foot of indoor air carries invisible water vapor. When that air drifts toward a window chilled by frigid outdoor temperatures, it cools rapidly. Once the glass drops below a threshold called the dew point — the exact temperature at which air can no longer hold all its moisture — the vapor turns into visible droplets. It is the same reason an ice-cold glass of lemonade "sweats" on a summer patio, just scaled up to the size of your living room window.
Here is the simple formula to keep in mind: higher indoor humidity plus colder outdoor temperatures plus poorly insulating glass equals more condensation inside the window. Change any one of those three variables, and you change the outcome.
Window condensation is a humidity and ventilation problem — not a window problem — in most cases.
That single idea reshapes how you should approach the issue. Many homeowners assume condensation on the inside of the windows means their glass is defective or their frames are failing. In reality, the windows are just the messenger. They reveal an indoor-environment imbalance — too much moisture, too little airflow, or both. Left unchecked, persistent dampness can invite mold condensation windows issues, wood rot, and musty odors that spread well beyond the sill. A dehumidifier window condensation strategy can help, but only after you understand exactly what is happening in your specific home.
Most advice on how to keep windows from sweating jumps straight to "buy a dehumidifier" or "upgrade your glass." Those fixes can work — but only if they match the actual cause. That is why this guide follows a diagnose-then-solve framework. You will start by identifying which type of condensation you are dealing with, then measure the humidity driving it, and finally layer in targeted fixes — from free, five-minute adjustments to longer-term ventilation upgrades. Each step builds on the one before, so you spend money only where it genuinely matters.
The journey begins with a quick diagnostic that pinpoints whether your condensation is forming on the interior surface, the exterior surface, or trapped between the panes — because each scenario calls for a very different response.

Before you spend a single dollar on fixes, you need to answer one critical question: where exactly is the condensation forming? Run your finger across the foggy surface. Can you wipe the moisture away from inside the room? Does the fog sit on the outdoor face of the glass? Or is it trapped between the panes where no finger can reach it? That simple touch test splits every condensation on windows scenario into one of three distinct categories — and each one points to a completely different root cause and solution path.
This is the type most homeowners encounter. You will notice water droplets or a misty film on the room-facing surface of the glass, usually concentrated along the lower edge or in the corners where airflow is weakest. It tends to appear overnight and worsen during cold snaps. If you can wipe it with a cloth from inside the house, you are dealing with condensation on the inside of windows.
Why do my windows have condensation inside? The answer almost always traces back to excess indoor humidity meeting glass that has cooled below the dew point. Kitchens, bathrooms, bedrooms with closed doors, and freshly built or renovated homes are the most common culprits. The good news is that windows condensation inside the room is the most controllable type — and the rest of this guide is built around eliminating it through humidity management, ventilation, and smart airflow adjustments.
Walk outside on a cool, still morning and you may spot a foggy haze on the outdoor face of the glass, often disappearing within an hour or two once the sun warms the surface. This looks alarming, but it is actually a sign your windows are doing their job well. High-performance low-e coated insulating glass units are designed to keep heat inside, which means the outer pane stays cooler — cool enough to collect dew from humid morning air, just like grass or a car windshield. If the condensation disappears once the sun comes up, your insulating glass is working exactly as intended.
Exterior condensation requires no action. You cannot control outdoor humidity or overnight temperatures, and wiping the outside of your windows every morning is neither practical nor necessary.
This is the one type that does signal a genuine window problem. If you see a cloudy, milky haze or streaky moisture trapped between the two panes of a double- or triple-glazed unit — and you cannot wipe it from either side — the hermetic seal has failed. Once that seal breaks, the insulating gas escapes and outside moisture creeps into the gap. A dehumidifier condensation windows strategy will not help here because the problem is structural, not environmental. The affected insulating glass unit needs professional repair or replacement to restore both clarity and energy efficiency.
| Condensation Type | Where It Appears | Root Cause | Your Next Step |
|---|---|---|---|
| Interior (room side) | Inside surface of the glass — wipeable from indoors | Excess indoor humidity + cold glass surface | Follow Steps 2–7 in this guide to reduce humidity and improve airflow |
| Exterior (outside) | Outdoor surface — visible from outside, clears with sunshine | Cool, still nights + high outdoor humidity + well-insulating glass | No action needed — your windows are performing well |
| Between panes | Trapped inside the sealed unit — cannot be wiped from either side | Failed seal on double or triple glazing | Contact a glazing professional for seal repair or unit replacement |
Take a moment right now to check your foggiest window and match it to the table above. If your condensation inside window surfaces wipes away with a towel from inside the room, you are in the majority — and everything from this point forward is designed to help you fix it. Interior condensation is driven by the air in your home, not by the glass itself, which means you have real control over the outcome.
The logical next question is straightforward: exactly how humid is your indoor air, and how low does it need to be to stop the sweating? Measuring that number — and knowing the target — is the fastest way to size up the gap between where your home sits today and where it needs to be.
You already know moisture buildup on inside of windows is a humidity-driven event. The question that changes everything is: what is the actual number? Guessing based on how the air "feels" is surprisingly unreliable — a room can sit at 55 percent relative humidity and still feel perfectly comfortable, even as that invisible moisture slowly fogs your glass overnight. The single most impactful move in learning how to keep windows from sweating is to stop guessing and start measuring.
The tool you need is called a hygrometer — a small, inexpensive device that reads the relative humidity (RH) in any room. Digital models are widely available for under twenty dollars, and most also display temperature. Pick one up at any hardware store, home improvement center, or online retailer. For the most useful data, place it at roughly breathing height — about three to five feet above the floor — and keep it away from heat sources, exterior walls, and drafty windows so the reading reflects the room's true average rather than a localized hot or cold spot.
A few practical pointers will sharpen your results:
For homeowners who want deeper insight, data-logging hygrometers record readings over time, revealing daily patterns — morning spikes, nighttime creep, and post-shower surges — that a single glance at a display would miss. These trends are the key to understanding how can you stop condensation on windows overnight, because they show you exactly when humidity climbs and how long it stays elevated.
Here is the piece most homeowners miss: the "right" indoor humidity level is not a fixed number. It shifts with the outdoor temperature. Colder outside air means colder window glass, which lowers the dew point on that surface. So the same 40 percent RH that feels perfectly safe in October can produce heavy condensation in January when outdoor temps plunge below zero.
Both the U.S. Environmental Protection Agency and the Center for Energy and Environment (CEE) publish guidelines that correlate outdoor temperature with maximum recommended indoor humidity. The table below synthesizes those recommendations into a quick-reference format:
| Outdoor Temperature Range | Recommended Max Indoor Relative Humidity |
|---|---|
| 20 °F to 40 °F (-7 °C to 4 °C) | Below 40% |
| 10 °F to 20 °F (-12 °C to -7 °C) | Below 35% |
| 0 °F to 10 °F (-18 °C to -12 °C) | Below 30% |
| -10 °F to 0 °F (-23 °C to -18 °C) | Below 25% |
| -20 °F to -10 °F (-29 °C to -23 °C) | Below 20% |
| Below -20 °F (below -29 °C) | Below 15% |
Those numbers may feel aggressively low if you are used to targeting 40 to 50 percent year-round for comfort. Yet physics does not negotiate — when it is -10 °F outside, even 25 percent indoor humidity can produce dehumidifier condensation challenges on poorly insulated single-pane glass. Double- and triple-glazed windows raise the interior surface temperature significantly, which means you can maintain a higher indoor RH before hitting the dew point. Still, the directional rule holds: the colder it gets outside, the drier you need to keep the air inside.
Compare your hygrometer reading against the table for today's outdoor temperature. If your RH exceeds the recommended maximum, you have found the primary driver behind how to stop windows condensating in your home — and a clear, measurable target to work toward.
There is a frustrating irony that catches many homeowners off guard. You build or renovate with tight air sealing, high-performance insulation, and brand-new windows — and the condensation gets worse, not better. Why?
Older, draftier homes leak air constantly. Those unintentional gaps act as crude ventilation, carrying moisture-laden indoor air outside before it ever has a chance to collect on glass. A modern, well-sealed home eliminates those leaks — which is excellent for energy bills — but it also traps every drop of moisture generated by cooking, showering, breathing, and even drying laundry indoors. The EPA notes that a tight, energy-efficient house holds more moisture inside and may require active ventilation strategies, such as running kitchen or bath exhaust fans, to compensate.
In other words, your new windows are not the problem. They are simply revealing a moisture load that used to escape through cracks and gaps. The solution is deliberate, controlled ventilation paired with the humidity targets in the table above — not cracking a window and undoing all those airtightness gains.
With your hygrometer in place and a clear humidity target matched to outdoor conditions, you have the diagnostic foundation. The natural follow-up is action: simple, no-cost adjustments you can make right now to start pulling that number down and drying out those foggy panes.

Your hygrometer is showing a number above the safe zone — so what can you actually do about it right now, without spending anything? Plenty. These five adjustments cost zero dollars and tackle inside window condensation at its roots: airflow and moisture sources. Each one either moves warm air toward the glass, reduces the humidity feeding the fog, or both. Prioritize them in order — the first fix alone makes a noticeable difference for most homes.
Every fix above shares one underlying principle: moving air stays warmer longer than still air. When warm, circulating room air continually washes over the interior glass surface, it transfers heat to the pane and keeps the glass temperature above the dew point. Stagnant air, on the other hand, cools quickly against the glass, drops below that threshold, and dumps its moisture as visible droplets. Think of it this way — a gentle breeze across the window acts like a natural shield against condensation.
This is why understanding how to get rid of condensation on windows starts with airflow, not gadgets. Before exploring a condensation windows dehumidifier setup or anything that plugs into an outlet, make sure warm air can actually reach the glass unobstructed. A room that already circulates air well may not need a dehumidifier at all.
These free fixes do not apply equally in every climate or every season. In cold, dry winter climates — think the Upper Midwest or Northern Plains — interior condensation is the dominant concern, and the five steps above directly address it. In humid summer climates like the Gulf Coast, however, the fog you spot is usually on the exterior face of the glass, caused by warm, muggy outdoor air hitting a pane cooled by air conditioning. That type of condensation is harmless, clears on its own, and is not something a desiccant leaking from window hardware or a dehumidifier can solve — because the moisture is outside your control.
Knowing which side of the glass is wet, and which season you are in, prevents wasted effort. Focus your energy on interior condensation during the heating season, when your actions have the greatest impact.
These zero-cost adjustments handle the broad strokes of airflow and moisture control. Yet two rooms in every home generate far more humidity than any other — and they deserve their own targeted ventilation strategy.
Kitchens and bathrooms are the two biggest moisture factories in your home. Boiling a pot of pasta, running the dishwasher, or taking a hot shower can spike a room's relative humidity by 10 to 20 percentage points in minutes. That burst of steam drifts toward the coldest surface it can find — your windows — and condenses almost instantly. Tackling moisture on inside of windows in these rooms requires more than the general airflow tips from the previous step. It demands targeted, room-specific ventilation that intercepts humid air at the source before it ever reaches the glass.
Here is a question worth asking yourself: when you turn on your range hood, does it actually send steam outside? Many homes have recirculating range hoods — units that pull air through a charcoal filter and blow it right back into the kitchen. These filters trap grease and odors reasonably well, but they do almost nothing for moisture. Every drop of water vapor from that boiling pot gets recycled back into the room, where it drifts toward cold window glass and fogs it up.
If you are serious about how to stop condensation on windows in the kitchen, you need an externally vented range hood — one with ductwork that carries humid air all the way outside through a wall or roof cap. The U.S. Department of Energy's Building America Solution Center recommends using rigid metal ductwork with the shortest, straightest path to the exterior. Excessive duct length, sharp bends, and corrugated plastic tubing all restrict airflow and reduce the fan's ability to pull moisture out of the room.
A few practical habits amplify the impact of a good range hood:
Not sure whether your current hood vents outside or just recirculates? Walk outside while the fan is running and look for a wall or roof vent cap. You should feel warm air blowing out. If you cannot find an exterior vent — or if the damper flap never opens — your hood is almost certainly recirculating, and upgrading it is one of the highest-impact changes you can make to how do you fix condensation on windows in the kitchen.
A hot shower generates a remarkable amount of moisture in a small, enclosed space. Without adequate exhaust, that steam clings to mirrors, tiles, and especially to cold window glass. The solution is straightforward: run your bathroom exhaust fan during every shower or bath and keep it running for at least 20 minutes afterward. That extended run time is critical — it takes longer than most people realize for a fan to fully evacuate the humid air left behind once the water shuts off.
The bigger concern, though, is whether your bathroom fan is actually exhausting air to the outdoors. In many older homes, exhaust ducts terminate inside the attic rather than through the roof or soffit. The Building America Solution Center documents this as a widespread issue — moist bathroom air dumped into the attic condenses on cold rafters and roof sheathing, encouraging mold growth and structural damage overhead while doing nothing to reduce humidity in the bathroom below.
You can verify your fan's performance with a simple test: hold a single-ply tissue or a small piece of toilet paper near the fan grille while it is running. If the tissue is pulled firmly against the grille and stays there, the fan is drawing air effectively. If it flutters weakly or falls away, you likely have a problem — a disconnected duct, a duct that ends in the attic, or a fan motor that has lost power with age.
How to prevent condensation on windows in the bathroom comes down to three rules: vent the fan to the outside, run it long enough, and confirm it is actually pulling air.
Sometimes the clues are hiding in plain sight. If any of the following sound familiar, your current kitchen or bathroom ventilation is not removing enough moisture:
Checking even one or two of these boxes is a strong signal that moisture is being stirred around the room rather than removed from it. Addressing these gaps — whether by extending ductwork to a proper roof or wall termination, upgrading to a higher-CFM fan, or switching from a recirculating hood to an externally ducted one — delivers an outsized return in reducing condensation on glass throughout the house.
Targeted room ventilation handles the big moisture spikes. Yet even between showers and cooking sessions, modern airtight homes need a steady, low-level exchange of air to keep background humidity in check — a role that exhaust fans alone are not designed to fill around the clock.
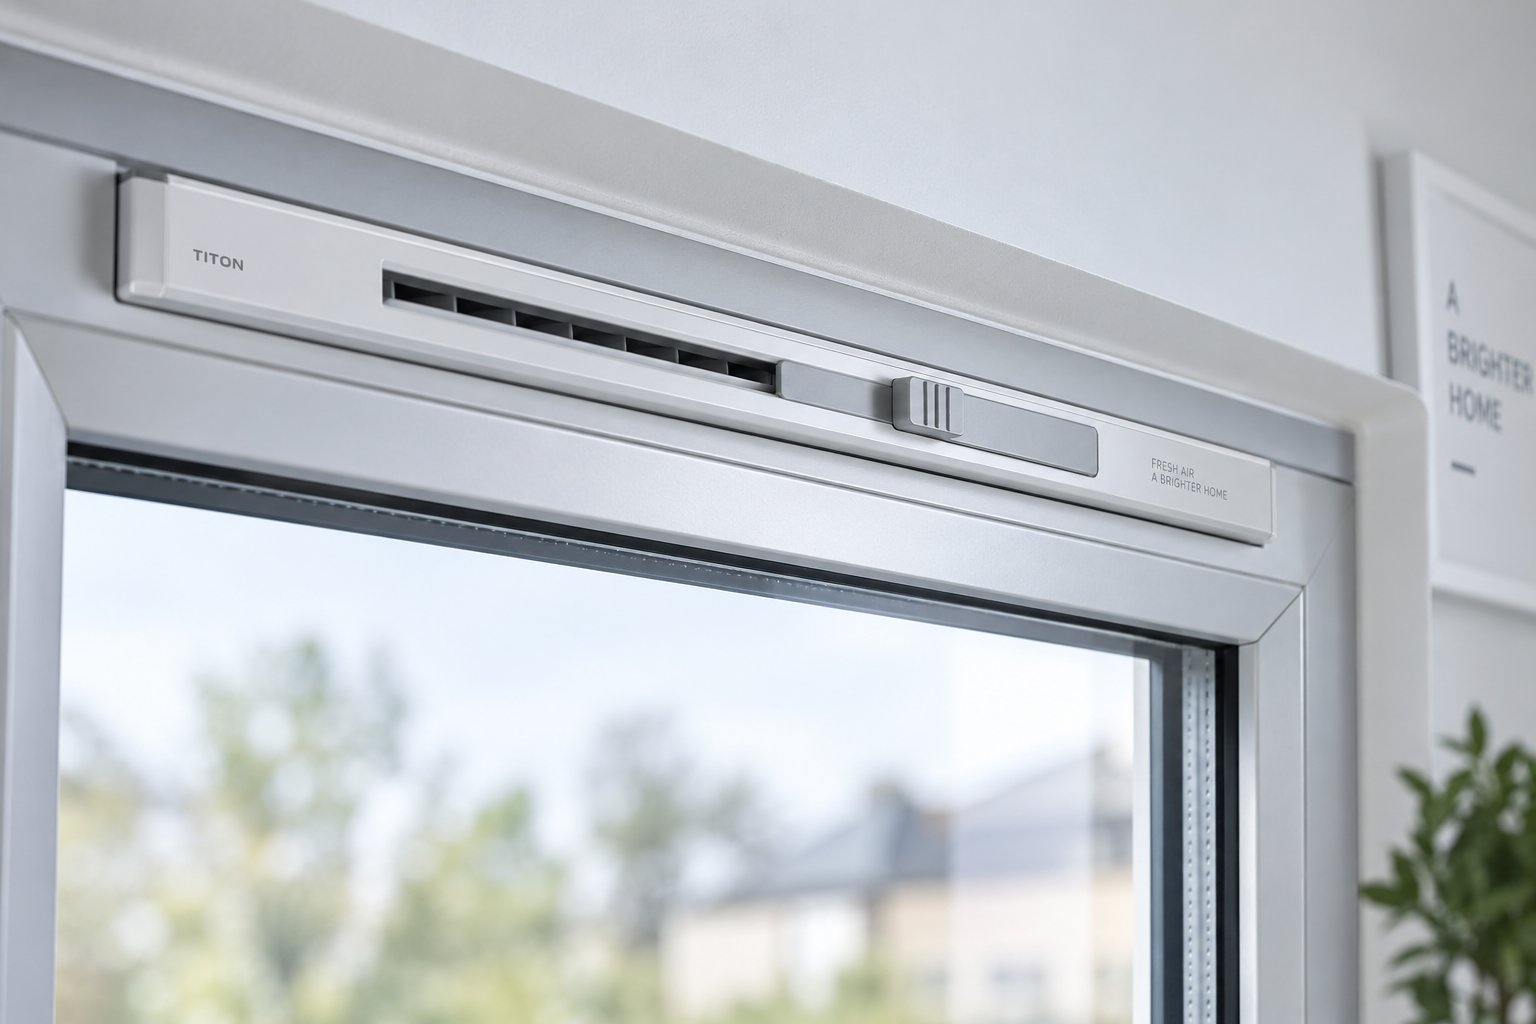
Exhaust fans do a tremendous job clearing moisture spikes from steamy showers and boiling pots — but they cycle off eventually. In the quiet hours between, your sealed-up home is still generating moisture through breathing, perspiration, and everyday activities. That slow, steady trickle of humidity is exactly what causes condensation on windows overnight, long after the kitchen fan has gone silent. Solving it requires ventilation that never sleeps — a gentle, permanent exchange of air that runs around the clock without needing a switch, a motor, or a single watt of electricity.
Background ventilation is the concept of maintaining a continuous, low-volume airflow through your home even when every window and door is firmly closed. Instead of flushing large volumes of conditioned air outside the way an exhaust fan does, it replaces small amounts of stale, moisture-laden indoor air with drier outdoor air at a pace so gradual you will never feel a draft or notice a bump in your heating bill.
Think of it like the difference between gulping water and sipping it. A wide-open window is the gulp — effective but wasteful in cold weather. Background ventilation is the steady sip, quietly keeping indoor humidity in check and preventing condensation on windows in winter without throwing away the heat you have already paid for. This approach is especially critical in modern, energy-efficient homes where tight air sealing has eliminated the natural infiltration that older, draftier houses relied on to carry moisture away.
The most practical and affordable way to achieve this kind of passive airflow is through trickle vents — small, adjustable openings installed directly into the window frame head. They sit at the very top of the frame, where rising warm air naturally exits while cooler replacement air slips in below. You can open, partially close, or fully shut them with a simple slider, giving you control over the rate of exchange based on the season and conditions.
If you live in a home built or renovated in the last decade, you have probably noticed the paradox discussed earlier: better windows, tighter seals, yet more window condensation. The reason is that airtight construction traps every gram of moisture your household produces. Trickle vents reintroduce a controlled leak — on your terms. They provide just enough air exchange to keep relative humidity below the dew point on the glass, without undermining your insulation or security.
Here are the key advantages that make trickle vents a standout solution for how to stop moisture on windows in any climate:
For homeowners and fabricators looking to source reliable trickle vent hardware, Shengxin Aluminium offers a uPVC Window Trickle Vent designed for both aluminium and uPVC window systems. It is a practical example of a purpose-built background ventilation component — engineered for durability, weather resistance, and straightforward integration into new or existing frames.
How do you stop windows from condensation in a home that is sealed tight for energy efficiency? You give the moisture a controlled exit. A trickle vent built into the frame head does exactly that — silently, permanently, and without compromising the airtightness you worked so hard to achieve. It bridges the gap between the spot fixes in the previous steps and the more intensive equipment-based solutions that follow.
Of course, some rooms — particularly basements, interior bedrooms, and spaces without any exhaust ducting — may still need extra help pulling humidity down to safe levels. That is where a strategically placed dehumidifier becomes the next piece of the puzzle.
Background ventilation and free airflow fixes handle a large share of the moisture load — but some rooms fight back. Basements with concrete walls that weep dampness, interior bedrooms with no exterior exhaust path, and laundry areas where wet clothes dry on racks all generate humidity faster than passive vents alone can clear it. In these stubborn cases, a dehumidifier becomes the single most effective purchase you can make to get rid of condensation inside windows for good.
Not every dehumidifier works the same way, though, and buying the wrong type for your room is a surprisingly common — and expensive — mistake. The key is matching the machine's technology to the temperature of the space you are trying to dry.
Two core technologies dominate the residential dehumidifier market, and each has a clear comfort zone.
Compressor dehumidifiers work much like a miniature air conditioner. They draw room air across refrigerated coils, and when that warm, moist air hits the cold surface, water condenses out and drips into a collection tank. This process is highly energy-efficient in heated living spaces — bedrooms, living rooms, home offices — where the ambient temperature stays above roughly 59 °F (15 °C). Drop below that threshold, however, and the coils begin to ice over. The machine then cycles into defrost mode, spending energy melting ice instead of pulling moisture on windows and walls out of the air.
Desiccant dehumidifiers skip the cold coils entirely. Instead, they pass humid air through a slowly rotating wheel coated in a moisture-absorbing material — typically zeolite. A small internal heater regenerates the wheel so it can keep absorbing. Because there are no coils to freeze, desiccant units perform consistently even in frigid garages, unheated basements, and conservatories where temperatures hover near freezing. A welcome side effect: they exhaust air that is roughly 18 °F (10 °C) warmer than the room, adding a touch of background heat — useful in the very spaces that tend to suffer the worst condensation on outside of windows during cold snaps.
The trade-off? Desiccant models typically draw about twice the wattage of a compressor unit to extract the same volume of water in a warm room. So if your problem room is heated, a compressor model gives you more moisture removal per dollar on your electricity bill.
| Feature | Compressor Dehumidifier | Desiccant Dehumidifier |
|---|---|---|
| Best Room Temperature | Above 59 °F (15 °C) | Any temperature, including near freezing |
| Energy Efficiency | Higher in warm rooms | Lower in warm rooms, but consistent in cold spaces |
| Noise Character | Mechanical hum from the compressor | Steady fan whoosh — no compressor vibration |
| Bonus Effect | None | Exhausts slightly warmer air, adding gentle heat |
| Approx. Cost Range | $150 – $350 for residential models | $200 – $400 for residential models |
Placement can make or break performance. If one particular window fogs relentlessly while the rest of the house stays dry, position the unit in that room with the door closed so it can draw down local humidity fast. For whole-floor moisture control — common in homes where condensation on exterior of windows appears benign but interior fog shows up in multiple rooms — a central hallway or landing works best. Keep internal doors open so moisture migrates toward the machine from every direction.
Regardless of where you set it up, follow these guidelines from appliance maintenance experts:
A neglected dehumidifier becomes part of the problem rather than the solution. Dust clogs the intake grille, mold colonizes a stagnant water tank, and a dirty filter forces the motor to work harder — driving up energy costs and noise while pulling less moisture out of the air. A simple monthly routine prevents all of that:
Some homeowners wonder whether a window anti condensation spray might offer a simpler alternative. These sprays work by causing moisture to sheet into a thin, transparent film rather than forming visible beads — but they do not reduce humidity in the room at all. The water is still there; you just cannot see the droplets as clearly. A spray might buy you a cleaner view for a day or two, but it is not a substitute for actually removing moisture from the air. If you want to know how to remove condensation from windows in a lasting way, a properly sized and maintained dehumidifier outperforms any topical product by a wide margin.
A dehumidifier tackles the air; the next logical step is to make sure the window itself is not undermining your efforts. Even the driest room will fog a pane that is leaking cold air through worn-out seals — and checking those seals takes less than five minutes.
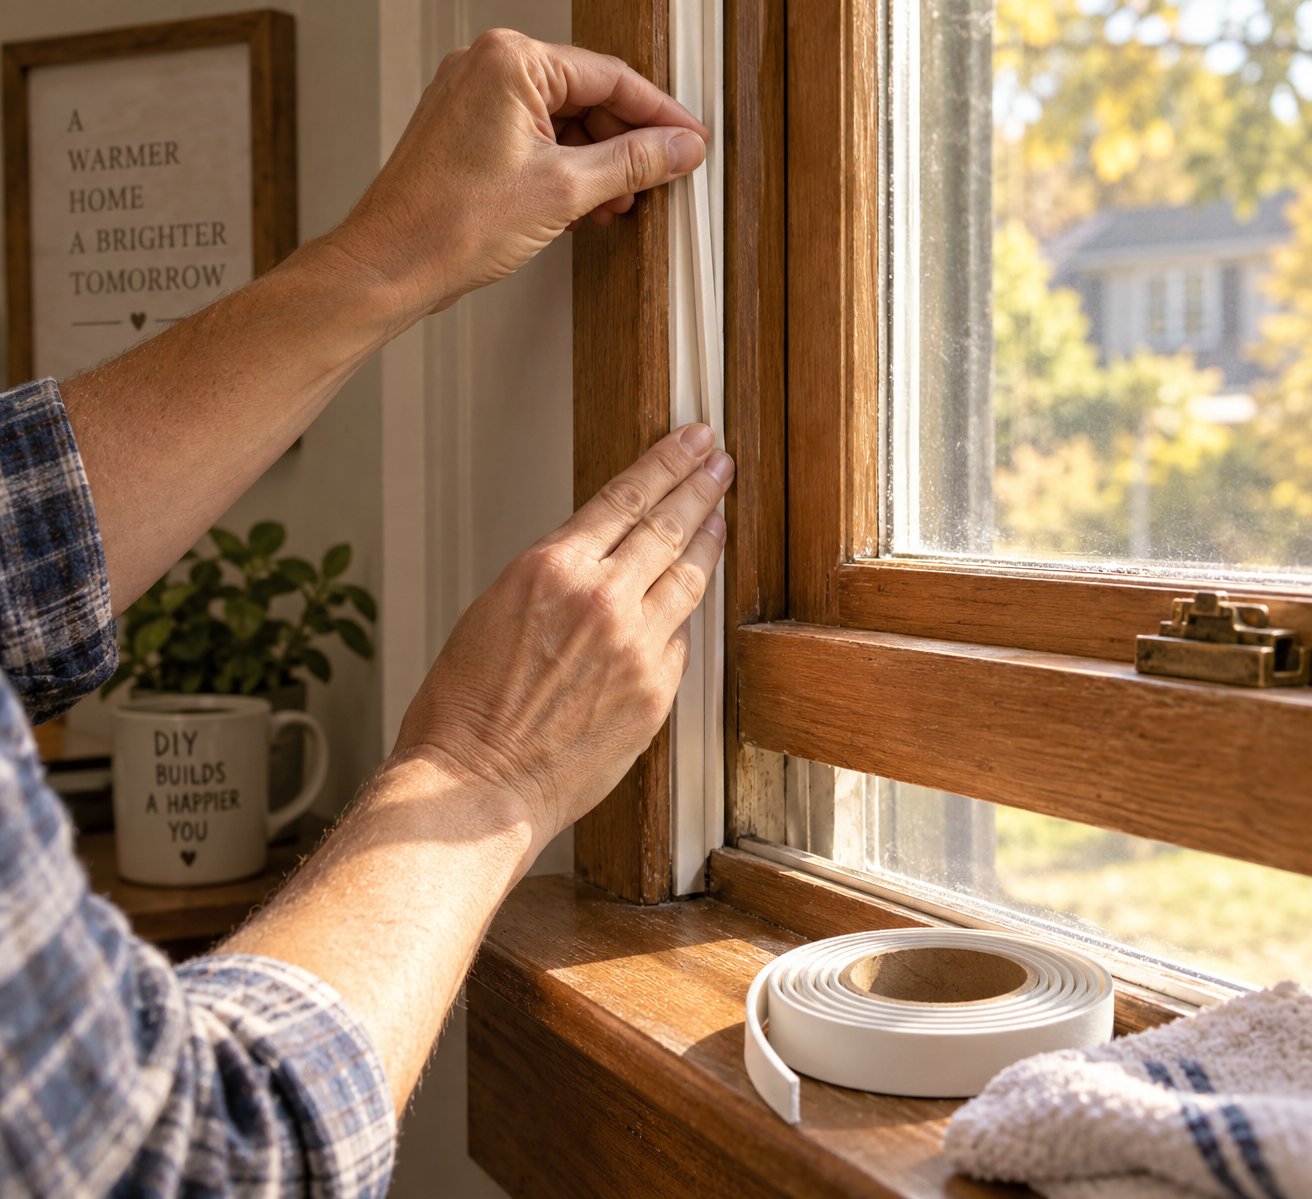
Your dehumidifier is humming, your exhaust fans are venting outdoors, and your trickle vents are sipping fresh air around the clock — yet one or two windows still fog up stubbornly every night. Why is there moisture on the inside of my windows when the humidity reads fine everywhere else? The answer often hides in plain sight, right along the edges of the frame. Worn, cracked, or compressed weatherstripping lets thin streams of frigid outdoor air seep past the sash, chilling the glass surface several degrees below what it should be. That localized cold spot drops the glass below the dew point even in a well-controlled room, and condensation on the windows in winter reappears no matter how dry the air is.
The good news: inspecting your seals takes less than five minutes, and replacing them is one of the cheapest DIY fixes in this entire guide — typically under fifteen dollars per window in materials.
You do not need any special tools for this — just your eyes, your hands, and a few minutes of daylight. Work through each window that gives you trouble using this quick sequence:
If any of those checks reveal problems, you have found a direct contributor to why is there condensation on my windows inside. Cold air infiltration drops the interior glass surface temperature, widening the gap between the glass and the dew point — and making condensation almost inevitable, regardless of how well you control humidity elsewhere in the room.
Swapping out degraded seals is a straightforward afternoon project. The process varies slightly depending on your window type, but the core steps apply universally:
Well-installed V-strip typically lasts five to ten years, while foam tape holds up for one to three seasons before needing replacement. Windows on sun-exposed western walls tend to degrade stripping roughly twice as fast, so plan to check those first each fall.
If your windows are older single-pane units and replacing them is not in the budget, consider adding a layer of shrink-fit window insulation film as a seasonal complement to fresh weatherstripping. These kits — available at most hardware stores for a few dollars per window — use double-sided tape and a sheet of clear plastic that you shrink tight with a hair dryer. The result is a trapped pocket of still air between the film and the glass, effectively creating a miniature secondary glazing system that can raise the interior surface temperature by eight to fifteen degrees Fahrenheit.
That temperature boost is often the difference between moisture inside window glass every morning and completely dry panes. The film will not solve a failed seal or eliminate high indoor humidity on its own, but when layered on top of proper weatherstripping, it closes the thermal gap that single-pane glass simply cannot bridge alone. Just be sure to dry the glass and frame thoroughly before installation — sealing film over a damp surface traps moisture behind the plastic, which can quietly damage wood frames over the course of a winter.
Knowing how to stop condensation on windows overnight is really about eliminating every path cold air uses to reach the glass. Tight weatherstripping blocks drafts at the frame. Insulation film raises surface temperature across the pane. Together, they give even aging windows a fighting chance against winter fog — and they set the stage for the final step: separating the fixes that genuinely work from the popular "hacks" that waste your time.
You have new weatherstripping on the frame, a dehumidifier pulling moisture out of the air, and trickle vents handling background ventilation. The temptation now is to pile on every tip you stumble across online — lighting candles, scattering rice bowls, spraying miracle coatings. Before you do, ask one simple question: does this hack actually reduce humidity or raise the glass surface temperature? If the answer is neither, it cannot prevent condensation on windows, no matter how many influencers swear by it.
Social media is flooded with quick-fix ideas that sound plausible but fall apart under basic physics. Sorting myth from method saves you time, money, and the frustration of watching fog creep back across a pane you thought was "fixed."
The candle-on-the-windowsill trick may be the most widely shared condensation hack on the internet. The logic seems reasonable at first — a flame warms the air near the glass, so condensation should evaporate. What that reasoning misses is combustion chemistry. Every candle flame produces carbon dioxide and water vapor as byproducts of burning wax. A single tea light can release roughly four to five grams of water per hour into the room. So while the tiny warm pocket near the wick may briefly discourage droplets on a few square inches of glass, the candle is simultaneously adding moisture to the very air you are trying to dry out. Real-world testing backs this up — a hands-on experiment by Homes & Gardens gave the candle method a score of just 1 out of 10, finding it produced no measurable reduction in window fog even after 45 minutes with a large wick.
The uncooked rice trick follows a similar logic flaw. Rice is technically hygroscopic — it does absorb a small amount of moisture from the air — which is why people toss a few grains into a salt shaker. But a bowl of dry rice sitting on a windowsill is hopelessly outmatched by the humidity load of an entire room. A typical home generates liters of moisture daily through cooking, showering, and breathing. A cup of rice might absorb a few milliliters overnight. You would need industrial quantities, replaced constantly, to make even a dent. Save the rice for dinner.
Anti-condensation sprays promise fog-free glass, and at first glance, they seem to deliver. Spray one on, and the window looks clearer the next morning. What is actually happening, though, is purely cosmetic. These products contain surfactants — the same compounds found in dish soap — that lower the surface tension of water. Instead of forming visible beads, moisture sheets into a thin, transparent film across the glass. The water is still there. The humidity has not dropped a single percentage point. And because the moisture remains on the surface, all the risks that come with it — mold from window condensation, wood rot, paint damage — continue unchecked behind the illusion of dry glass.
Then there is exterior condensation, the type that sends homeowners into a panic on cool, still mornings. Why is there condensation inside my windows — except it is not inside at all. It is on the outdoor face. Exterior fog forms when humid overnight air meets a pane that high-performance low-e glass has kept cool precisely because it is preventing heat from escaping your home. If anything, morning dew on the outside of your windows is proof that your insulating glass is doing exactly what it was designed to do. It clears on its own once the sun warms the surface, and it requires zero intervention.
If you have been wondering why do my windows have condensation on the inside despite trying every internet hack, the reason is straightforward: none of those tricks lower indoor humidity or raise the glass surface temperature. Those two levers — and only those two — are what physics responds to.
Here is the encouraging reality: most homeowners can eliminate interior window condensation entirely by combining just two or three of the steps covered in this guide. Start with the free fixes — opening curtains, improving airflow, and keeping moisture sources away from the glass. Layer in targeted kitchen and bathroom ventilation to catch the biggest humidity spikes. If your hygrometer still reads above the safe zone for your outdoor temperature, add a dehumidifier or install trickle vents for round-the-clock background ventilation. And if a stubborn window still fogs after all of that, check the weatherstripping — a five-minute inspection and a few dollars of V-strip can close the last gap.
Windows with moisture are not a mystery and they are not a lost cause. They are a signal — one that tells you exactly where the imbalance lives and how to correct it. Armed with a hygrometer, a clear humidity target, and the diagnose-first framework you have from the start, you have everything you need to wake up to clear glass and dry sills, every single morning.
Overnight, outdoor temperatures drop significantly, which chills your window glass well below its daytime temperature. At the same time, indoor humidity tends to rise as doors and windows stay closed and exhaust fans are turned off. When warm, moisture-laden bedroom air contacts that colder glass surface, it cools past its dew point and releases water droplets. Opening curtains slightly, running a ceiling fan on low, and keeping indoor relative humidity aligned with the outdoor temperature guidelines in a hygrometer-based monitoring routine are the most effective ways to stop overnight condensation.
Yes. Persistent moisture on glass, frames, and sills creates the damp environment mold spores need to colonize. Wood frames are especially vulnerable because they absorb water and stay wet long after the glass dries. If left unaddressed, mold can spread to surrounding drywall and paint. The key to prevention is eliminating the moisture source rather than just wiping droplets away — lowering indoor humidity with proper ventilation, using a dehumidifier in problem rooms, and ensuring weatherstripping seals tightly so cold air does not create extra-cold spots on the glass.
In most cases, no. Interior condensation signals an indoor humidity and airflow imbalance, not a window defect. Adjusting your home's relative humidity, improving ventilation with exhaust fans or trickle vents — such as those designed for aluminium and uPVC frames by manufacturers like Shengxin Aluminium — and ensuring warm air circulates near the glass will usually resolve the issue. The only scenario that points to a window problem is condensation trapped between the panes of a double- or triple-glazed unit, which indicates a failed seal requiring professional repair or glass replacement.
There is no single magic number — the target shifts with outdoor temperature. When it is between 20 °F and 40 °F outside, aim for below 40% indoor relative humidity. As outdoor temps drop toward 0 °F, you may need to lower indoor RH to 25-30%. In extreme cold below -20 °F, keeping humidity under 15% may be necessary, especially with single-pane glass. A digital hygrometer costing under twenty dollars lets you monitor these levels accurately and adjust ventilation or dehumidifier settings in real time.
Anti-condensation sprays create a cosmetic improvement, not a real fix. They contain surfactants that cause water to spread into a thin, transparent sheet instead of forming visible beads, so the glass looks clearer. However, the moisture remains on the surface, indoor humidity stays unchanged, and the risks of mold, wood rot, and paint damage continue unchecked. For lasting results, focus on reducing the actual moisture in the air through ventilation upgrades, dehumidification, and proper airflow near the glass rather than masking the symptom with a spray.



 Интернет Сервис
 0086 136 3563 2360
 sales@sxalu.com
 +86 136 3563 2360
 русский
 English
 français
 Deutsch
 español
 português
 العربية
 ไทย
 Việt
 Українська